The Google Chrome browser is fast, and adequate with security and privacy features that you can adjust to improve your browsing experience. The browser downloads files to the computer every time you open webpages and these files are called "temporary internet files" or "browser cache" which are actually bits and pieces of the webpage components such as pictures, cookies, etc. The temporary internet files are safe but they can accumulate over time and will take up some of your hard drive space. They can also often cause slowness in browsing as well as show outdated content of a webpage. Deleting the temporary internet files from time to time is advisable because you will be freeing up disk space and this is a primary step in fixing browsing problems. Therefore, if you experience slowness in opening webpages, showing outdated content, or not able to open webpages at all, you must first try clearing the browser cache to fix these problems.
Here are the steps to clear the browser cache on Google Chrome version 83, the steps are just the same or similar to the older or newer versions.
1. Click the CUSTOMIZE AND CONTROL icon that looks like three dots arranged vertically located on the top right corner of the Google Chrome window, choose MORE TOOLS option, and then click on CLEAR BROWSING DATA... option. (Alternatively, you can press the CRTL and SHIFT keys of the keyboard at the same time, while pressing them, hit the DEL key.)

2. Click the ADVANCED tab.

3. Click the pull down menu labeled "Time range" and click on ALL TIME option.
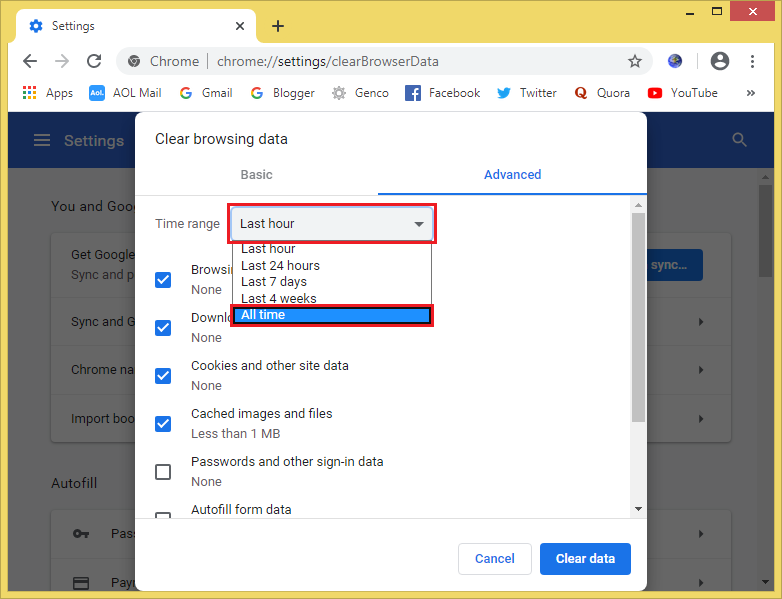
4. Pull the scroller that is on the right edge with the mouse to the bottom of the options.

5. Click on each of the check boxes labeled "Passwords and other sign-in data", "Autofill form data", "Site Settings", and "Hosted app data" to put check marks in them. (You can skip the check box labeled "Passwords and other sign-in data" if you want to retain your saved passwords.)

6. Click the CLEAR DATA button.

Here are the steps to clear the browser cache on Google Chrome version 83, the steps are just the same or similar to the older or newer versions.
1. Click the CUSTOMIZE AND CONTROL icon that looks like three dots arranged vertically located on the top right corner of the Google Chrome window, choose MORE TOOLS option, and then click on CLEAR BROWSING DATA... option. (Alternatively, you can press the CRTL and SHIFT keys of the keyboard at the same time, while pressing them, hit the DEL key.)
2. Click the ADVANCED tab.
3. Click the pull down menu labeled "Time range" and click on ALL TIME option.
4. Pull the scroller that is on the right edge with the mouse to the bottom of the options.
5. Click on each of the check boxes labeled "Passwords and other sign-in data", "Autofill form data", "Site Settings", and "Hosted app data" to put check marks in them. (You can skip the check box labeled "Passwords and other sign-in data" if you want to retain your saved passwords.)
6. Click the CLEAR DATA button.
No comments:
Post a Comment