I have a SanDisk Ultra flash drive with the capacity of 64GB and I used it to create a Windows 8.1 installation backup. I decided later on that I now need the SanDisk Ultra flash drive to be used as a data drive and erase the Windows 8.1 installation backup so I reformatted it. I did not notice at first that creating the Windows 8.1 installation backup made my SanDisk Ultra flash drive into a 32GB capacity only until I decided to reformat it. No matter if I do a quick reformat or a full reformat, the computer reads my SanDisk Ultra flash drive as a 32GB storage capacity only. Based on what I have read, the Windows 8.1 operating system and below will not format storage drives with higher capacity than 32GB on FAT32 system that is why even if your storage drive is larger than 32GB, it will only be reformatted to the maximum of 32GB. Thankfully, it does not matter if your 64GB or higher capacity flash drive, SD card, SSD, etc. only show lesser than it is supposed to be because the solution to this is very easy.

The 64GB SanDisk Ultra USB flash drive only showing as 32GB (31.9GB) capacity.
Here are the steps to fix storage drives showing lower capacity than they should be.
1. Right-click on the START button located on the bottom left corner of the screen and choose DISK MANAGEMENT option.
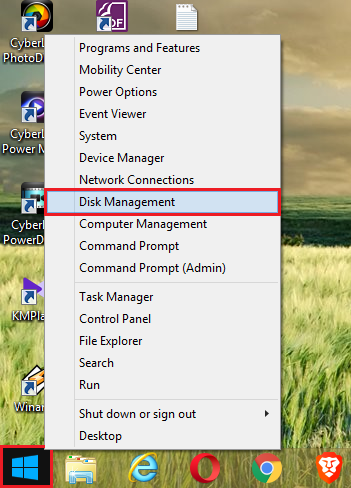
It shows that the 64GB SanDisk Ultra USB flash drive labeled as "Disk 1" is actually 64GB (57.84GB) but with an unallocated space of 25.84GB plus the formatted 32GB FAT32.

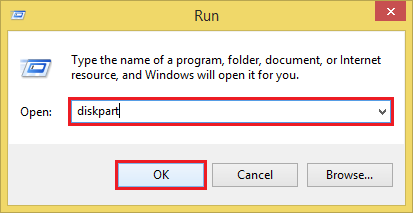
2. Right-click on the START button again and choose RUN option.

3. In the Run window, type diskpart into the "Open:" field box, then click the OK button. This will open the operating system's console window.
4. On the DISKPART> prompt, type list disk and hit the ENTER key on the keyboard to list the active disks.

In this case, there are two disks that are active, which are the "Disk 0" which is the primary hard drive, and the "Disk 1" which is the SanDisk Ultra flash drive showing as 64GB (57GB) capacity.

5. Therefore, on the DISKPART> prompt again, type select disk 1 and hit the ENTER key on the keyboard. WARNING: In your case, the storage drive that you want to fix may have a different label and size, therefore you must make sure that you are selecting the correct one, else you will be messing the wrong drive alongside with your precious files.
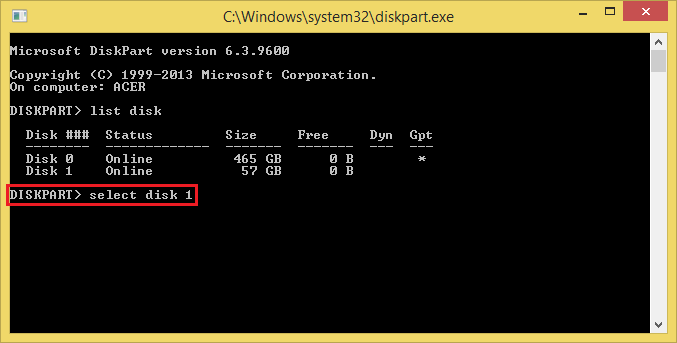
The "Disk 1" is now selected which is the SanDisk Ultra flash drive and we are now ready to make actions on it.

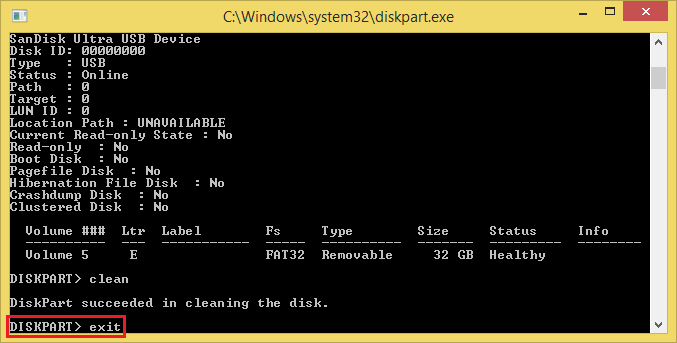
6. On the DISKPART> prompt again, type detail disk and hit the ENTER key on the keyboard, this will give us the details about the "Disk 1" that we selected to make sure we are on the right path.

Disk details shows that it is indeed the SanDisk Ultra USB flash drive so we are good to go.

7. On the DISKPART> prompt again, type clean and hit the ENTER key on the keyboard to finally start over again with the SanDisk Ultra USB flash drive.

You will get the message "DiskPart succeeded in cleaning the disk."

You can confirm that the SanDisk Ultra flash drive has been reset by opening up the File Explorer and you will now see that the flash drive is not showing up any size anymore.

8. Finally on the DISKPART> prompt, type exit to close it.
9. Right-click on the START button again located on the bottom left corner of the screen and choose DISK MANAGEMENT option.

You will now see that the unallocated space of 25.84GB plus the formatted 32GB FAT32 were removed and it is now the complete 64GB (57.84GB unallocated) real capacity.

10. Right-click on the 57.84 GB UNALLOCATED space and choose NEW SIMPLE VOLUME... option. The New Simple Volume Wizard window will open.

11. On the New Simple Volume Wizard window, click the NEXT button to proceed.

12. The real capacity of 64GB (59230MB) is showing, click the NEXT button.

13. Click the NEXT button.

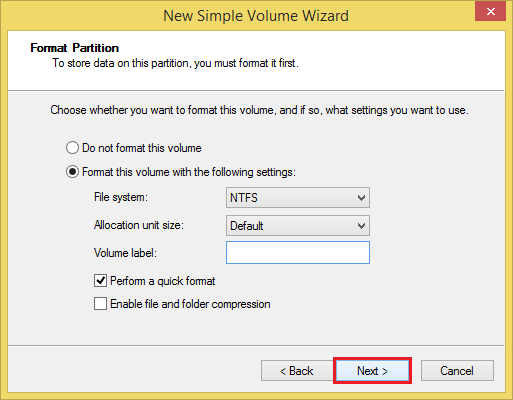
14. We are now ready to format the new volume, you can elect the name for it like the name of your flash drive, or name it for the purpose you want to use your flash drive.

In this case, I erased the name and left it blank, the operating system will name it generically as "Removable Disk" instead. Click the NEXT button.
15. Click the FINISH button.

Going back to the Disk Management window, the full capacity of the SanDisk Ultra flash drive is back to its full capacity of 64GB.

The SanDisk Ultra flash drive is back to its full capacity of 64GB which can also be confirmed by opening the File Explorer window and it is ready to go.


The 64GB SanDisk Ultra USB flash drive only showing as 32GB (31.9GB) capacity.
Here are the steps to fix storage drives showing lower capacity than they should be.
1. Right-click on the START button located on the bottom left corner of the screen and choose DISK MANAGEMENT option.

It shows that the 64GB SanDisk Ultra USB flash drive labeled as "Disk 1" is actually 64GB (57.84GB) but with an unallocated space of 25.84GB plus the formatted 32GB FAT32.

2. Right-click on the START button again and choose RUN option.

3. In the Run window, type diskpart into the "Open:" field box, then click the OK button. This will open the operating system's console window.

4. On the DISKPART> prompt, type list disk and hit the ENTER key on the keyboard to list the active disks.

In this case, there are two disks that are active, which are the "Disk 0" which is the primary hard drive, and the "Disk 1" which is the SanDisk Ultra flash drive showing as 64GB (57GB) capacity.

5. Therefore, on the DISKPART> prompt again, type select disk 1 and hit the ENTER key on the keyboard. WARNING: In your case, the storage drive that you want to fix may have a different label and size, therefore you must make sure that you are selecting the correct one, else you will be messing the wrong drive alongside with your precious files.

The "Disk 1" is now selected which is the SanDisk Ultra flash drive and we are now ready to make actions on it.

6. On the DISKPART> prompt again, type detail disk and hit the ENTER key on the keyboard, this will give us the details about the "Disk 1" that we selected to make sure we are on the right path.

Disk details shows that it is indeed the SanDisk Ultra USB flash drive so we are good to go.

7. On the DISKPART> prompt again, type clean and hit the ENTER key on the keyboard to finally start over again with the SanDisk Ultra USB flash drive.

You will get the message "DiskPart succeeded in cleaning the disk."

You can confirm that the SanDisk Ultra flash drive has been reset by opening up the File Explorer and you will now see that the flash drive is not showing up any size anymore.

8. Finally on the DISKPART> prompt, type exit to close it.

9. Right-click on the START button again located on the bottom left corner of the screen and choose DISK MANAGEMENT option.

You will now see that the unallocated space of 25.84GB plus the formatted 32GB FAT32 were removed and it is now the complete 64GB (57.84GB unallocated) real capacity.

10. Right-click on the 57.84 GB UNALLOCATED space and choose NEW SIMPLE VOLUME... option. The New Simple Volume Wizard window will open.

11. On the New Simple Volume Wizard window, click the NEXT button to proceed.

12. The real capacity of 64GB (59230MB) is showing, click the NEXT button.

13. Click the NEXT button.

14. We are now ready to format the new volume, you can elect the name for it like the name of your flash drive, or name it for the purpose you want to use your flash drive.

In this case, I erased the name and left it blank, the operating system will name it generically as "Removable Disk" instead. Click the NEXT button.

15. Click the FINISH button.

Going back to the Disk Management window, the full capacity of the SanDisk Ultra flash drive is back to its full capacity of 64GB.

The SanDisk Ultra flash drive is back to its full capacity of 64GB which can also be confirmed by opening the File Explorer window and it is ready to go.

No comments:
Post a Comment