The browser cache is the location where most of the temporary internet files are stored like cookies from websites that you visit. The cookies are small text files created by the website that you visited to save the settings that you placed on the website especially if that website does not require signing on. Other temporary internet files are the images on the websites, they are stored locally on your computer after they were downloaded from the server so that they will show up faster on your screen. There will be times that you will need to clear the browser cache especially if the website that you frequently visit is not updating, this just means that it is directly loading from the temporary internet files stored on your computer instead of getting the updated one from the website's server. Other reason why you need to clear the browser cache is privacy. If there are other people who are using your computer, they will be able to know if what are the websites that you visit, and they will also know the passwords that you used to login to the websites if the browser was set to save them. If you are the only person who uses your computer and it is protected with passwords, it is safe not to clear the browser cache but it is still best to clear it from time to time. You can never tell, one time, you forgot to lock your computer and someone peeped into it. Safety and security is not a requirement but rather a necessity.
Here are the steps to clear the Google Chrome 68 cache.
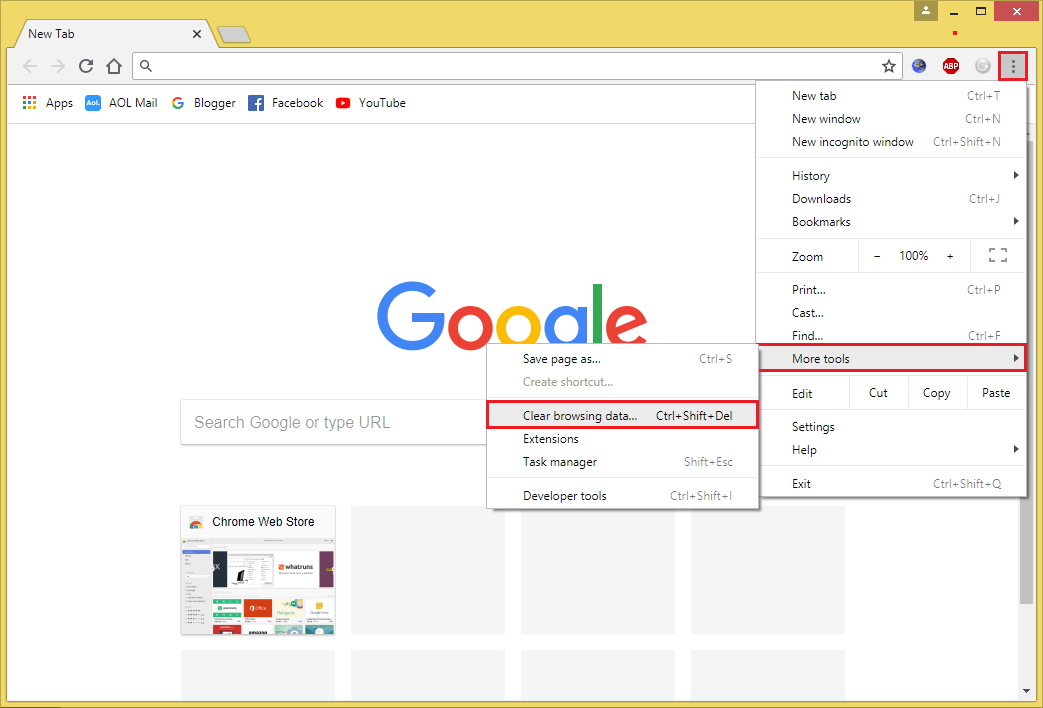
1. Click the menu button located on the top right corner of the Google Chrome 68 browser that have three dots arranged vertically in it, choose MORE TOOLS option, and then choose CLEAR BROWSING DATA... option. (Alternatively, you can press the CTRL and SHIFT keys of the keyboard at the same time, then hit the DEL key.)

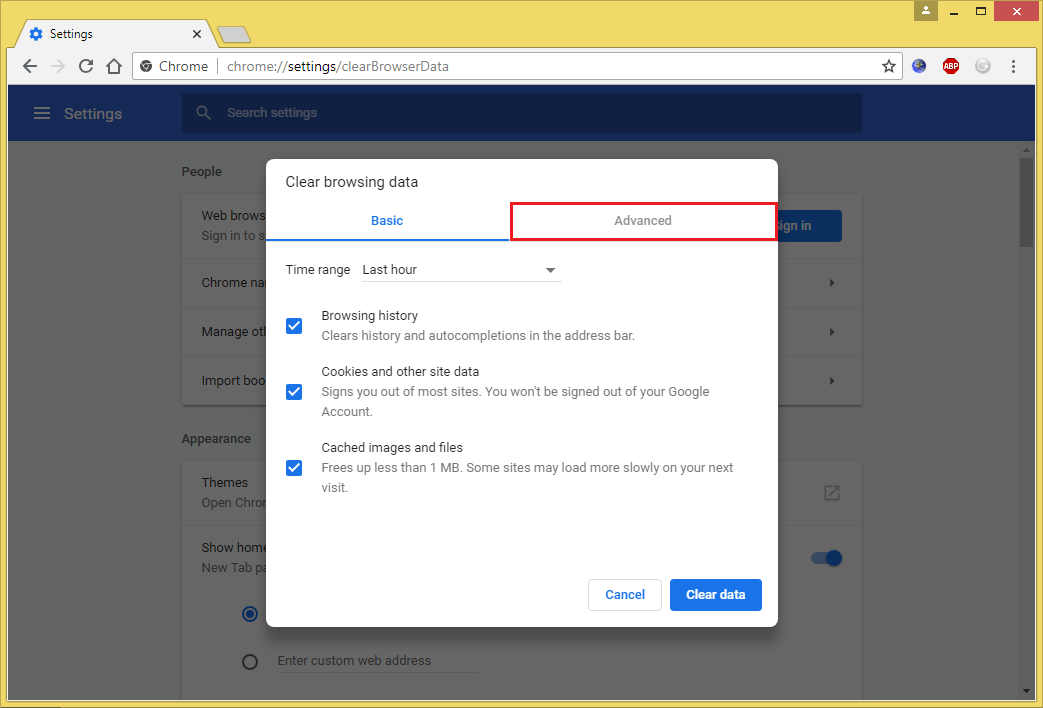
2. Click the ADVANCED tab.

3. Put a check in the boxes for each of the browsing data that you want to be deleted. If you do not want the saved passwords to be deleted, leave the "Password" check box unchecked.

4. Click the pull down menu labeled "Time range" and choose ALL TIME option.

5. Click the CLEAR DATA button.

Here are the steps to clear the Google Chrome 68 cache.
1. Click the menu button located on the top right corner of the Google Chrome 68 browser that have three dots arranged vertically in it, choose MORE TOOLS option, and then choose CLEAR BROWSING DATA... option. (Alternatively, you can press the CTRL and SHIFT keys of the keyboard at the same time, then hit the DEL key.)

2. Click the ADVANCED tab.

3. Put a check in the boxes for each of the browsing data that you want to be deleted. If you do not want the saved passwords to be deleted, leave the "Password" check box unchecked.

4. Click the pull down menu labeled "Time range" and choose ALL TIME option.

5. Click the CLEAR DATA button.

No comments:
Post a Comment