Taking a screen shot in the screen of the Macintosh computer is not the same as in taking a screen shot in the Windows operating system. Taking screen shot in the Macintosh computer has more options than taking screen shots on Windows. Taking screen shot in the Macintosh has taken the road into a more serious path by using more keystrokes for different options. If you noticed, the keyboard of the Macintosh computer does not have the PRINT SCREEN key. So, how will get a screen shot of what is showing in your monitor?
On Macintosh computer, you will take screen shot by using combination of keyboard keys.
The keys that you will use are:
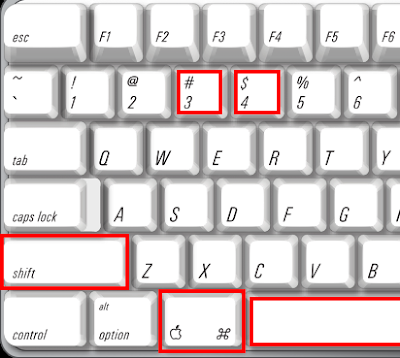
1. COMMAND (It is usually written in abbreviated form as CMD. It has a four-cornered clover-like symbol on all modern Macintosh keyboards. It has an APPLE symbol on old ones)
2. SHIFT (The SHIFT key located on the bottom left corner of the keyboard)
3. SPACE BAR (The longest key on the keyboard that you use to put space between characters or words)
4. 3 (The number three key)
5. 4 (The number four key)
ENTIRE SCREEN
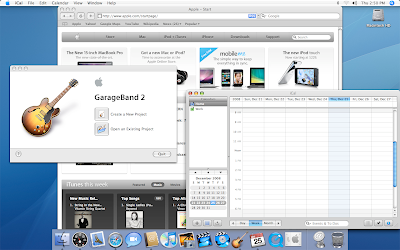
To take a picture (screen shot) of the entire screen, hold down CMD (Command) and SHIFT keys on the keyboard at the same time, while pressing them, press the number 3 key. Then release. You will now see a new file on the desktop view called "Picture 1".
PART OF THE SCREEN
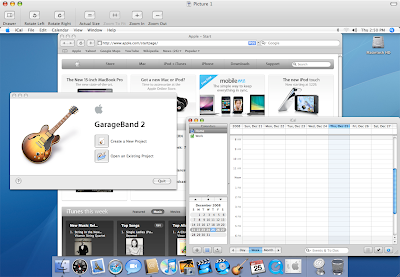
To take a picture of just part of the screen, hold down CMD (Command) and SHIFT keys on the keyboard at the same time, while pressing them, press the number 4 key. Then release. Then click your mouse and drag it around the area you want to capture. Click once to make the screen shot.
OBJECT OF THE SCREEN
To take a picture of an object on the screen such as a window, the menu bar or the dock, hold down CMD (Command) and SHIFT keys on the keyboard at the same time, while pressing them, press the number 4 key. Then release. Press the SPACE BAR. Move the mouse to the object you want to capture and click the mouse when it's highlighted or when the mouse pointer turns into a camera.
NOTE:
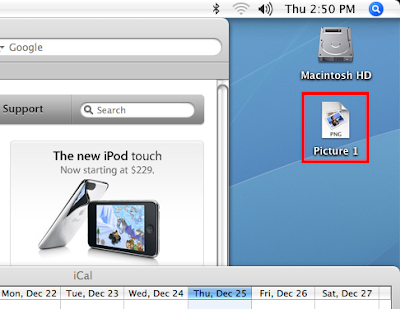
The screen shots will show up on your desktop view with a file name of "Picture 1". Additional screen shots will be placed on the desktop in files called "Picture 2", "Picture 3" and so on. Double click any "Picture" file to view it in the Mac OS X image viewer. The file format of the pictures are in the .PNG format.

On Macintosh computer, you will take screen shot by using combination of keyboard keys.
The keys that you will use are:
1. COMMAND (It is usually written in abbreviated form as CMD. It has a four-cornered clover-like symbol on all modern Macintosh keyboards. It has an APPLE symbol on old ones)
2. SHIFT (The SHIFT key located on the bottom left corner of the keyboard)
3. SPACE BAR (The longest key on the keyboard that you use to put space between characters or words)
4. 3 (The number three key)
5. 4 (The number four key)

ENTIRE SCREEN
To take a picture (screen shot) of the entire screen, hold down CMD (Command) and SHIFT keys on the keyboard at the same time, while pressing them, press the number 3 key. Then release. You will now see a new file on the desktop view called "Picture 1".

PART OF THE SCREEN
To take a picture of just part of the screen, hold down CMD (Command) and SHIFT keys on the keyboard at the same time, while pressing them, press the number 4 key. Then release. Then click your mouse and drag it around the area you want to capture. Click once to make the screen shot.
OBJECT OF THE SCREEN
To take a picture of an object on the screen such as a window, the menu bar or the dock, hold down CMD (Command) and SHIFT keys on the keyboard at the same time, while pressing them, press the number 4 key. Then release. Press the SPACE BAR. Move the mouse to the object you want to capture and click the mouse when it's highlighted or when the mouse pointer turns into a camera.
NOTE:
The screen shots will show up on your desktop view with a file name of "Picture 1". Additional screen shots will be placed on the desktop in files called "Picture 2", "Picture 3" and so on. Double click any "Picture" file to view it in the Mac OS X image viewer. The file format of the pictures are in the .PNG format.

No comments:
Post a Comment